
Smartibot Instructions
Apps
iOS:
https://itunes.apple.com/us/app/smartibot/id1334831980
Android:
https://play.google.com/store/apps/details?id=com.raa.smartibot
Chrome Webapp:
https://thecraftyrobot.github.io/smartibot_webpad/
Web IDE: https://thecraftyrobot.net/SmartibotIDE/
Troubleshooting
My Smartibot won’t turn on
First of all make sure you have fully charged AA batteries in the battery box, that they are in the correct orientation, that the connector between battery box and circuit board is fully inserted, and that the switch on the battery box is in the on position. Next, if you have one, try plugging a micro USB cable into the socket to the right of the battery connector, connecting the other end to a USB port and seeing if the circuit board powers up (a green LED should appear to the right of the battery connector if the board is getting power). If the board powers up with the micro USB cable but not the battery box, and the batteries are definitely good, send us a message and we will send you a new battery box. If the board still doesn’t power up with the micro usb cable also let us know as well and we will work out a solution.
How do I connect the app to the Smartibot in control pad mode?
Press the icon with the little picture of the Smartibot’s face and an upside-down WiFi icon. This will bring up the connection list, select your Smartibot and the upside-down WiFi icon should be replaced by a tick and you are connected.
I still can’t connect
Check that Bluetooth is switched on on your phone or tablet and that the Smartibot app has permission to access ‘Bluetooth’ on your iOS device and ‘location’ on Android (we don’t know why there isn’t a distinct Bluetooth permission on Android).
Bluetooth is definitely working and my Smartibot is powered up but it doesn’t appear as an available connection
Try switching your Smartibot off and on again
My Smartibot has stopped responding to commands from the app
Try switching your Smartibot off and on again and re-connecting
My Smartibot goes backwards, or turns, when it should go forwards
Check that the motors are wired up correctly. The wires for the starboard motor should be connected to M1 and the port motor to M2. For both motors the red wire should be connected to the upper screw terminal and the black wires to the lower one.
My Smartibot just spins it’s wheels instead of moving
You can add traction by putting the smaller elastic bands that come in the kit over the wheels. They should sit down in the grooves between the two sides of the wheels.
My Smartibot won't drive in a straight line when I press forward on the control pad

Small variations in how your Smartibot is assembled can mean that it turns slightly to left or right when you press forward on the control pad rather than driving forward in a perfectly straight line. You can adjust its forward trajectory by editing the control pad to change the balance of power sent to the two motors.
You can edit the pad by pressing the edit button in the top right corner...

and then you can edit each control element by pressing the little pencil icon on top of it

If you are working on the classic pad you will want to edit the motor powers in left hand orange button, underneath where it says 'PRESSED', and in the the '+' shaped control pad under where it says 'U'.
If your Smartibot is tending to turn to the left you should either send more power to M2 (by, for example for the + pad, moving the M2 slider from -65% to -70%)...

OR send less power to M1 (by, for example for the left orange button, moving the M1 slider from 100% to 95%).
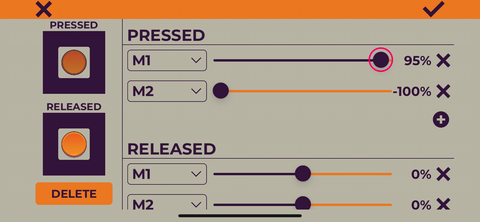
If your Smartibot is still turning left you should try further increases in the power sent to M2 or reductions in the power sent to M1.
If, after making a change, your Smartibot has started turning to the right (the opposite direction to before) you have changed the power levels too much and should try values in between the original values and the new values.
If your Smartibot was tending to turn to the right you should do the reverse of the adjustments above, sending more power to M1 and less power to M2.
This approach can also be taken for the other control elements. For the joysticks you should edit the the sliders under Y0 and Y100 and for the 'Two Channel' controller you should edit the sliders under '0' and '100'.