
Make a toy crane that is powerful enough to lift a full drinks can by reusing parts from a Smartibot kit. Measure the voltage and current when your crane is working in order to calculate how much power and energy it is using, how much work it is doing lifting and its efficiency. There is a version of this tutorial to print out and use in the classroom here.
Building a cardboard crane
Here's pretty much everything you'll need:

From a Smartibot kit: circuit board, battery box, DC motor, wheel mount, 4 x short bolts, 2 x long bolts, 6 x nuts, 1 x pointy screw
Cardboard, Glue gun + glue sticks, craft knife or scalpel, cutting mat, ruler, tape
The templates for the cardboard parts printed on A4 or letter size paper
Electrical multimeter, strong thread, drinks can
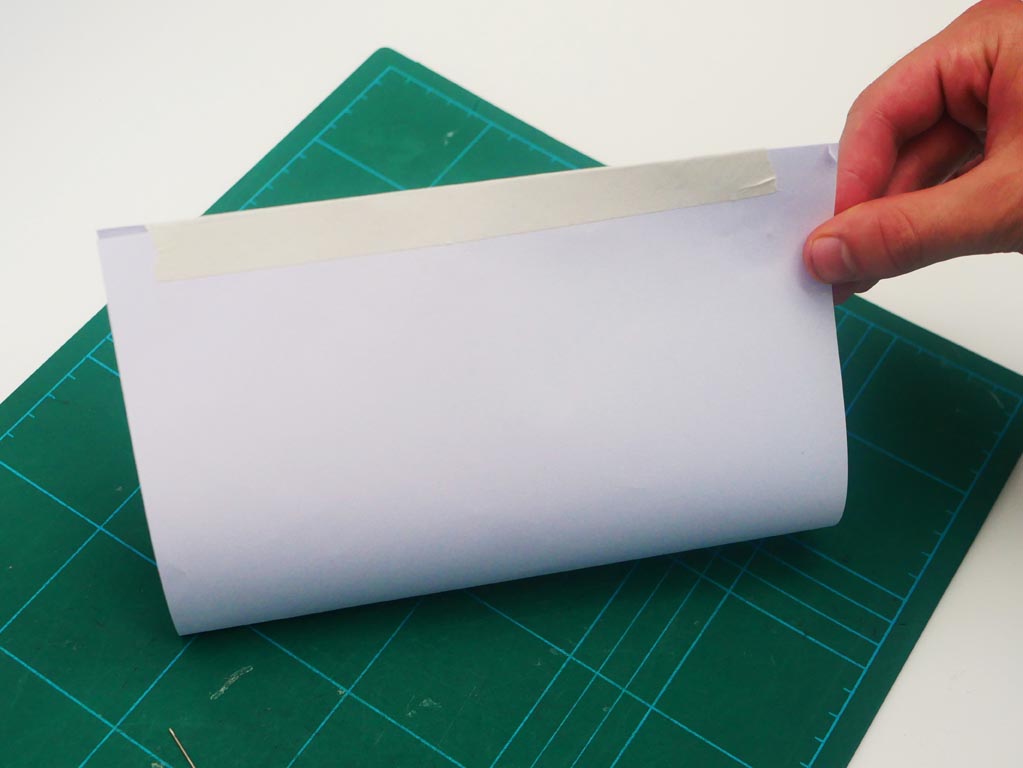
The First step is to take some scissors and cut roughy around each paper template. Then stick them down to the cardboard with masking tape as shown below. Don't cut to the line at this point yet as that will come in the next step!

Use the '+' head screwdriver that comes in the Smartibot kit to poke holes through the cardboard wherever you see a small circle. These are where your screws will go later.

Next, press down hard with the edge of the ruler along the dotted lines as shown. The aim is to create visible, indented lines that we will then use to fold the cardboard around later.

Now, using a ruler and a craft knife, it's time to cut out those cardboard shapes along the solid lines shown on the templates.

With all the cardboard shapes cut out, it's time to fold! Fold along the lines you pushed in with the ruer earlier. Don't worry about them staying folded, glue or screws will hold things together later.

Taking the neck, the long bolts, nuts and the motor and attach the motor to the neck as shown:


Putting the neck with the motor to one side for now, it's time to get gluing. Use the glue gun to glue a zig zag pattern onto one of the long rectangular pieces, and then stick it to the other one. Hold them together for a few seconds to get a strong bond!


Now apply a zig zag pattern of hot glue on the tabs at the ends of the assembly you have just made. Glue it to the neck, then do the same for the other side. Remember to hold the pieces together for several seconds so the glue has a chance to cool and solidify!


Now, to stabilise the back frame so it won't be flimsy and wobble everywhere, we glue this small gusset piece on top. Just line the top of the back frame with hot glue as shown below, then stick it on.


Now we need to make the box that will hold our Smartibot circuit board and its batteries. Glue along both of the edges and stick the two pieces together.


Now we need to stick that box to the neck. Glue along the three edges shown, then add two dots behind that where the two parts will also be in contact. Use the line on the paper template for the central crane feature to show you where to stick the box.


Motorising your cardboard toy
Now you've made the cardboard chassis for your crane it's time to make it work by adding the Smartibot circuit board and battery box.
Screw in the circuit board onto the front of the box using the four smaller bolts, with nuts, with the nuts on the front. Then get the battery box fitting snugly inside!

Use a small pointy screw and a screwdriver to attach the wheel mount to one side of the motor. You choose! We will use the wheel mount as the crane's pulley.


Next connect the wires from the motor into the M1 screw terminals on the Smartibot circuit board.
Now let's make the cradle to hold the drinks can. First, join the two short sides of the paper in half and stick them together with tape.

Now, cut a 45cm long piece of strong and thread it on a needle. Push the needle through one corner of the tape as shown. Remove the needle and tie a knot around the top of the tape so this corner will stay in place. Then attach the needle to the other side of the thread, and push it through the other corner of the tape, and tie another knot here to keep this in place. The line of string connecting the two corners should be slack, and when it is lifting a weight it will be taught.


With the cradle made, we just need to attach it to the crane using the pulley. Cut a 125 cm long piece of thread and tie a knot around the thread that is attached to the cradle, to connect them. Then thread the other end of the longer piece of thread through one of the holes in the wheel mount, as shown below.

App controlled toy crane
Now you need to spool the string around the pulley a little. Connect he battery box and turn on the Smartibot circuit board using and connect via Bluetooth to the Smartibot app. Go to the control pad and use the classic pad to drive the motor. You can use the d-pad or the two orange buttons, but the buttons are faster.

And there you go! The crane is set up to use. Just weigh down the back part with some heavy books, leave the neck and motor hanging off the edge of the table and place something to be lifted in the cradle.
Doing a physics experiment with the crane
The experiment designed here is to find how efficient our crane is. If you don't know what efficiency is, don't worry. All will be explained later. The values we recorded will be included in the instructions so you can see the maths we did to understand it better, but don't worry if your readings aren't the exact same. There are also explanations of why these things work how they do, but you can follow the instructions and then read over the explanations again later.
This is what the experiment will look like:

Step1 - Weigh the can
Use a scale to measure the mass of the drinks can. Ours was 360 grams, so 0.360 kg.
Step 2 - Set up the ruler
Find a wall or table leg parallel to the dangling string. Tape a 30cm ruler along it so the can will be lifted along the length of the ruler. Use more tape or paperclips to mark the 10cm and 25cm lines clearly. This means there will be an uninterrupted, clearly visible 15cm length to lift the can through. We only had a 20cm ruler, so we marked from 5cm to 20cm, as you can see.

Explanation A - What is Current?
The metal wires that connect the Smartibot circuit board to the motor form a an electrical circuit. The wires themselves contains small particles called electrons. When these electrons flow through the wires that's electricity being conducted! Current is a measure of how many electrons are flowing, (in this case into the motor) every second.

Step 3 - Measure the current when lifting the can
To measure current, you need to connect a multimeter in series with the motor. Do this by taking one of the motor wires out of the screw terminal connector on the side of the Smartibot circuit board and replacing it with one of the multimeter's probes. Take connect the other multimeter probe to the end of the motor wire you have just removed.
Set your multimeter for measuring current up to an amp. Place the can in the cradle and drive the crane so it lifts it. Record the current, in amps, whilst the can is being lifted. Our current was 0.21A. We used the orange buttons to drive the motor for this experiment, but you can use the d-pad if you want - just use the same one throughout.

Explanation B - What is Energy?
Another important concept to think about with our crane is energy. We can think of energy as the ability to do something useful, but It is actually energy changing from one form to another that makes things happen. For example, when a light bulb lights up electrical energy is changing into light energy. A solar panel does the opposite, turning light energy into electrical energy.
A change, of anything, usually means there is energy is involved, and a bigger change usually means more energy. There are lots of different kinds of energy but there are three that are part of this experiment.
Then there is the motor, which spins, meaning it has 'kinetic energy'. Kinetic energy is the name for the energy carried by things that are moving.
And finally there is the can, which is lifted from the ground, against the force of gravity. If we were to let the can go it would fall back towards the ground, getting faster and faster, so as we lift it we are actually storing energy in it. Energy that is stored in objects is called potential energy and if it is stored in an object that has been lifted up (against gravity) it's called 'gravitational potential energy'.
And we said before, a bigger change means more energy. This means when something is higher, since it can fall further, it has more gravitational potential energy.


Then the motor uses its kinetic energy to pull the string around the pulley, which lifts the can its kinetic energy is transferred to the can's gravitational potential energy.

So, to recap, the electrical energy carried by the electrons in our circuit is changed to the kinetic (movement) energy of the motor as it rotates which is then changed to the gravitational potential (height) energy of the can. Phew.
Explanation C - What is Voltage?
Now that you understand energy, and that it comes in different forms, you're ready for voltage! Voltage is just another measurement to do with the electrons that make up electricity. It's a measurement of the amount of energy that each electron carries.
Step 4 - Measure the voltage when lifting the can
To measure voltage, connect the multimeter in parallel with the motor. To do this reconnect the motor wire that you previously disconnected to the Smartibot screw terminal connector, then poke one of the multimeter probes into each side of the connector (next to each wire). Now lift the can in the same way as before, this time recording the voltage, in volts, across the motor whilst the can is being lifted. Our reading was around 4.3V.

Explanation D - What is Power?
How fast an object turns energy from one another is called power. Because there are different forms of energy, there are different forms of power too.
Step 5 - Calculate the electrical power
You can calculate the electrical power going into your motor when it is lifting the can, from the electrons in the circuit, using the useful equation:
Electrical power (W) = voltage (V) * current (A).
So our electrical power input was 4.3V * 0.21A = 0.903W.
Step 6 - Time the lifting of the can
You can measure the time taken to lift the can through the 15cm length. You could take a video of the lift happening and calculate the time by looking at the timecode for the two relevant frames, or you could watch it and measure the amount of time the top of the cradle takes to move between the two marks on the ruler using a stop watch. Make sure you choose a single point on the cradle to watch for as it passes the start and end of the 15cm or else the length will not be exact. Our time was 2.60s.
Step 7 - Calculate the gravitational potential energy
You can calculate the (extra) gravitational potential energy transferred to the can, over the 15cm lift using the equation:
Change in gravitational potential energy (J) = mass of can (kg) * gravitational field strength * change in height (m).
Assuming you are doing this experiment here on planet Earth you can use gravitational field strength = 9.8N/kg, and as the change in height is 15cm this equals 0.15m. Gravitational field strength is basically what it sounds like - how strong gravity is in a certain place.
So the gravitational potential energy gained by our can over our 15cm lift is: 0.360kg * 9.8N/kg * 0.15m = 0.5292J.
Step 8 - Calculate the mechanical power
Now you can calculate the power the crane is producing to lift the can (transforming the kinetic energy from the motor into gravitational potential energy in the can). As it is a machine doing something we tend to call this 'mechanical power'. Power is just how fast energy changes form, so the mechanical power output is simply the gravitational potential energy transferred to the can over the 15cm, divided by the time taken:
Mechanical power out of motor (J) = gravitational potential energy (J) / time (s).
So our mechanical power output was: 0.5292J / 2.6s = 0.20354W.
Explanation E - What is Efficiency?
Not all of the energy transferred to the motor by the electrons is actually transferred by the rotating motor to the gravitational potential energy of the can. This is because some of the energy gets lost during these energy transfers, as it is converted to heat or sound energy, rather than first the kinetic energy of the motor and second the gravitational potential energy of the can. For our crane, as our goal is to lift the can, we want all of the energy to be transferred to kinetic energy of the motor and then to the gravitational potential energy of the can - any energy changed to heat or sound energy is wasted.
Efficiency is the measurement of how much of what you want you get out of something relative to what is wasted. In this experiment we are talking in terms of these useful or wasted energy transfers. It goes from 0 to 1 with 1 being only useful energy transfer and 0 being only wasted energy transfer. If all the electrical energy of the electrons was given to the kinetic energy of the motor and then all of that was given to the gravitational potential energy of the can, the efficiency would be 1. Or the other way round, if all of the energy was lost as heat and sound energy and the can was not lifted at all, the efficiency would be 0.
Step 9 - Calculate the efficiency
You can calculate the efficiency of the crane using the equation:
Efficiency = mechanical power output (W) / electrical power input (W).
So our crane had an efficiency of 0.20354W / 0.903W = 0.225.
So our crane was 22.5% efficient - not great. Less than 1/4 of the energy given to the motor was then used to lift the can.
What was yours your motor's efficiency?
Explanation F - Why only 23% efficiency?
The thing about looking at the efficiency of a whole system, like our crane, is that it is the product of the efficiencies of all the parts involved, multiplied together. So you could have a whole series of individual parts that have high efficiencies on their own, but when you link them all together (and so multiply their efficiencies) you end up with a low number.
This is probably what is happening with the Smartibot motor in our crane. It is actually made up of an electric motor (the cylindrical grey bit) and then a series of plastic gears (inside the yellow part). If you were to open up the gearbox you would find that there are four stages (pairs of plastic gears meshing together, reducing the speed and increasing the turning force of the motor each time). If we assume the efficiency of the motor in converting electric energy to kinetic energy is 60% and then assume each of the four pairs of gears in the gearbox has an efficiency of 80% the total efficiency calculation looks like this:
Motor Efficiency * gear efficiency ^ 4 = 0.6 * 0.8 * 0.8 * 0.8 * 0.8 = 0.245
or 24.5% which is pretty close to the efficiency we observed.
Step 10 - Congratulate yourself!
Well done for reading all the way here! We hope you have had fun building your crane and that you understand a bit more about energy, power and efficiency. Can you think of any other machines you could build with cardboard and the parts from a Smartibot kit? Can you think of ways of measuring and calculating the efficiency of those machines?
Now it's time to have some fun with your crane. We built a little cardboard platform for ours which our toddler really enjoyed playing with.
